Coffee With a Friend

I have been thinking more and more about things that make me happy and why I don’t spend enough  time doing them. I have come to the conclusion that there is definitely a creative side of my brain that is not being flexed enough and I must do and intend to do more about that. When I started this blog, I noticed that as I filled the virtual pages, I felt better about things in general. There was no specific Bob Briskeything I felt better about and I don’t know if the family noticed, but it was very obvious to me the I had a smile on my face a bit more often. The act of writing was helping me express whatever creative stuff was trying to ooze from the right side of my brain and I feel better on the days that I do write.

The welding class that I just finished had the save affect on me. Every Saturday I had that creative outlet that allowed me to relax, clear my mind of work related issues and just have fun creating. You may think that welding is not creative but you would be wrong. From afar i looks like the welder is just melting two pieces of metal together, but it is more than that. In order to be a good welder you need to know your equipment very well. Some welders describe it as being one with your machine, almost a zen like experience. It reminds me of that movie “Breaking Away” where the father of the bike racer explains that he had this set of tool for cutting rock (he worked in a quarry cutting limestone) that allowed him to cut the stone as if it were butter. He knew his tools so well that he could perform at his peak every day, cutting through stone almost effortlessly. That is how I feel when I am creating something. I am living in the moment with a smile on my face truly enjoying what I am creating. 

The reason I scheduled my coffee meeting this morning was to pick the brain and exchange ideas with my friend Bob.  I referenced Bob and his photography career in my post Party Like It’s 1979 from earlier this year. I have always enjoyed Bob’s work and I actually got more interested in photography after working with him on the “LION” our high school newspaper.  I wanted to exchange a few ideas with him and see if I was going down the right path with some things I am thinking about.

Bob had some great ideas and our conversation quickly turned to our kids, careers and even a few possible business ideas. We both agreed that this was a productive meeting and that we should continue our dialog over the next few months to see what happens. I can’t wait to see what he has in mind.

Welding Class Final

It is always sad when you come to the end of something, whether it be a vacation, a job, a relationship or in this case, a class that I really enjoyed. Over the past 16 weeks, I have commented on many of my experiences in the class. This unfortunately is my last one for this class. I plan on taking an advanced welding class, but I am not able to do so until fall as there are no Saturday classes offered during the summer.

I left the house at 7 am, a little earlier than usual. I wanted to stop and pickup some doughnut holes for the class to enjoy before the test. Little did i know three other people had almost the same idea. When I arrived , there were three dozen doughnuts on the work table to which I added my box of doughnut holes. Lots of sugar to keep us going today. A few of us had also agreed to wear orange tee shirts on this final day as kind of a homage to our instructor Ted. Ted has worn an orange tee shirt to class every Saturday for the past 16 weeks and today was no exception. Unfortunately only one other guy besides me, remembered to wear the orange tee. Regardless, Ted got a kick out of it, which was the intent.

As I mentioned last week, I had two more TIG labs to complete and I was intent on getting both of them done today no matter what. We all signed in and received a quick run down of what today would look like: Two hours in the lab, one hour of review and one hour to take the final. We exited the class room and made a dash for the lab. I say dash because everyone knew they only had two hours to complete whatever labs they had left and there were only so many booths setup for each of the four welding processes. There were only six booths setup for TIG which is what I was concentrating on finishing today and by the time I got out there four of them were already taken. The only two left were booth three which is the messed up one I worked with last week, and booth two which had no firebrick on the bench and a fairly new machine. The firebrick is usually to the side of the metal grate welding surface so that you can set your pliers, goggles filler rod etc. The brick does not conduct electricity so it is safe to set all your ‘stuff’ that you are not directly using during the weld.

I decided to use booth two so I went into booth three and grabbed half a dozen bricks to at least fill half the bench surface. That way I was able to spread out my equipment and work comfortably in the booth. I assembled my TIG torch, turned on the Argon gas flow, turned on the welding machine, checked all the settings and hit the foot pedal to test the gas flow. All system go. Off to the dreaded sand blaster.

Luckily I only had to clean four or five pieces of steel for these two exercises so I would only waste maybe 30 minutes on the cleaning process. The blasting booth was not any better this week and actually it seemed a little worse than usual. I had to keep pumping the gun trigger to get any noticeable sand flow to come out of the nozzle. I decided to only do one edge of each of the two steel pieces that would be used for the butt joint. Since only about 1/2 inch down the length of each piece would be touched by the arc, that is all I really needed to clean. I only did two pieces to start as I was anxious to get to the actual welding.

Back in the booth, I arranged the two pieces of steel on the metal welding surface, about an eighth of an inch apart with one inch of each piece hanging over the table edge. I do the overhang so that I can tack the end together with a quick weld. I then flip the two pieces around and tack the other end. If I did not do this, the two pieces would move closer together as the metal heated up during the weld.

With both ends tacked and cooled enough to hold the pieces steady, I checked my helmet settings, grabbed a filler rod and started the but joint weld.  I was immediately in the grove making small concentric circles as I added filler to the weld. The soft blue arc and the gentle buzz of the torch was very soothing and as always helped me concentrate on the task at hand. Once I start doing this at home, I can’t wait to add some classical music or maybe some Stones to the mix. Zen indeed.

I completed the butt joint with almost 100% penetration across the length of the gap. Not perfect but good enough to turn in with limited time. I quickly walked back to the blasting booth and did three more pieces of steel. I wanted to try the butt one more time to see if I got better results and I still need to do some straight beads with filler on the surface. Ten minutes later the blasting was done and I was back in the booth. I tried the butt joint one more with the same results so I set those two aside to clean up later and jumped on the filler task.

The filler task went very well as I have a pretty steady hand and the only trick is to feed the filler rod into the heat but not into the arc so that it melts in as evenly as possible. The goal is to have a nice straight bead with even height across the whole length of the plate. I ran six rows of beads with filler and was satisfied with the results, so I took that plate and the original butt joint task over to the quenching tank (we need to cool the metal in water in order to work with it without gloves), dried them off with the air hose and polished them up with the grinder for submittal.

I finished both tasks with 15 minutes to go, so I cleaned up my booth and headed back to the classroom for the review. We spent the next hour reviewing what we had learned in the past 16 weeks, then we jumped online to take the final. 30 minutes later I was done as were most of the other guys, so we went back to our seats until everyone was finished. By 11:45 everyone was done and we all sat around for the last 15 minutes talking to and thanking the instructor for his time and talents.

I really enjoyed the class and was glad I was able to fit it in this spring. I look forward to the advanced class in the fall and can’t wait to do my own setup in the planned shed in the backyard.

Mind The Gap

Last Saturday I missed welding class since I was in Minnesota for Jen’s Volleyball tournament. I had just started in TIG (GTAW or Gas Tungsten Arc Welding) and I was anxious to get back to it and finish my last two exercises. Two weeks ago I had finished the simple exercise of laying down plain stringer beads with no filler and I still needed to complete the stringer with filler and the dreaded butt joint.

I grabbed a booth as soon as I got to class and requested the necessary parts from the instructor to setup my machine. Once you start TIG our instructor gives you a Ziploc bag that must be turned in at the end of the day. The bag contains the tungsten rod, gas diffuser, cup and Colette that attach to the welding torch that we use.

TIG_torch-accs

I setup the torch, turned on my gas supply (Argon Gas), turned on the TIG Machine hit the foot pedal to test the gas settings and was just about ready to go. That is when the fun (sarcasm) started.

Welding_power_supply-Miller-Syncrowave350LX-front-triddle

One of my class mates Bill, wanted to share the booth with me which I agreed to. We had both started the class in January as lab partners and had gotten along very well. We were both able to look at each others work and make constructive suggestions for improvement. So he brought his helmet, gloves, Ziploc etc into the booth and sat down to get started. Just then my instructor Ted came up and asked me to move to another booth thinking we could get more done if we did not have to split time on the machine. I reluctantly agreed and moved to the only other open TIG booth. Little did he know that move would waste so much more time than it would save.

The first issue was this booth had one of if not the oldest TIG machines in the lab. Every thing was manual on the box which is great if this is the welder you have in your shop and you need to weld on all different types of metals and most importantly, you have experience with this particular machine and know all the settings.

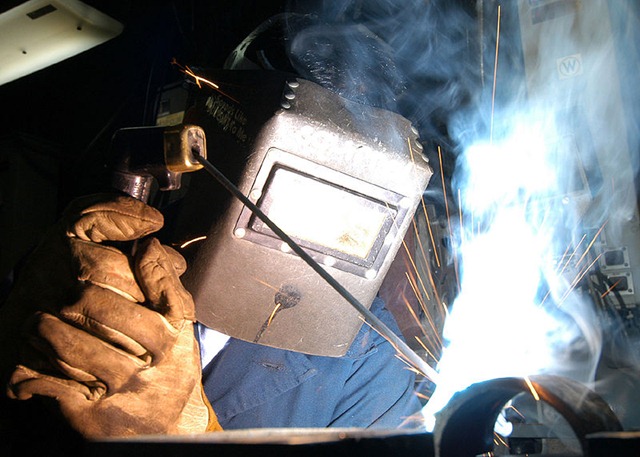
Ted said he would set it up for me and all I had to do was setup the torch and adjust the gas. I went down to the original booth, got my gear and proceeded to setup the torch. Right off the bat things did not look good. There are threads on the heat side of the torch where you screw in a nozzle that allows the shielding gas to surround the Tungsten rod protecting it from Welding Equipmentcontamination by oxygen as you weld. Some of the threads were cracked off but not enough to impact the gas flow, or so I thought. I assembled the torch, set my Argon gas flow, turned on the welder and hit the pedal (starts the flow of gas and controls the amperage of electrical current) and all looked good. I put on my  gloves, placed my 2” x 4” steel plate on the welding surface, put on my helmet and got into position to start a bead on the steel surface. I hit the pedal and….nothing. I backed ff the pedal and tried again. Still nothing. I tried again and this time I waited almost 10 seconds and finally the arc started, but the arc was not small and precise, it was all over the place and very sloppy.

The TIG arc should be very fine and precise if you have all your equipment tuned in correctly so I knew something was wrong with the machine. After all, it could not be me right?

I turned everything off, disassembled the torch and asked Ted to come take a look. I expressed my concern about the wear on the torch assembly and he agreed that this would impact gas flow and on closer inspection discovered there was a part part missing inside.

We spent the next 45 minutes removing the old torch and refitting a new one. I took an extended period of time because TIG torches are water cooled and when you remove the water hose from the welding machine there is water leakage so I had to clean the floor to a completely dry state so as to not risk electrical shock when I fired it up again. The 12 foot torch cables (water, positive electric and negative electric) are also housed in a rubberized/Velcro type sheath so we had to take that off the old torch and fit it on to the new one.

Pain in the butt right? Well the upside is I got hands on changing out a torch instead of just reading about it which non of the other students had a chance to do. I like to try and find positives in most any situation and this was a prime example.

So once again I repeated my checklist to fire up the machine and start welding. The arc was a little smaller but I still noticed that it was dancing all over the metal and it started to pulse on and off. The arc should be a nice steady and quite blue glow almost mesmerizing. Something was still wrong. I checked the settings on the machine and called Ted over. We both noticed the major issue almost immediately. The machine was set for AC instead of DC. What the heck? So the person who was previously in the booth was probably welding aluminum and had not set the machine back to DC as they are supposed to do when they are done for the day. I joked with Ted that this is the last time I trust him to setup the machine himself without me checking his work and he responded with a sly smile that he did it on purpose to see if I was paying attention.

We only have two hours in the lab next Saturday and then we take the final that same day to complete the class. I have three exercises still to complete and had hoped to knock out two labs today and have only one to do next week before the final.

But hope will only get you so far as all the equipment issues were making the 4 hour class disappear faster than I wanted. Even after all the repair and checking the machine was still not kicking in when I pressed the pedal so I decide not to mess around and I jumped back into my original booth with Bill. He agreed to let me share time with him and we at least had the advantage of two tungsten rods to share.

Tungsten rods can become contaminated pretty easy if you are not careful to keep them out of contact with your molten metal pool especially if you are using filler rods to add to you weld. If the rod becomes contaminated, you need to stop shut off the power, remove the rod, grind off the contaminate then use a special tungsten grinder to clean it even more and shape it to a fine tip. By having two rods, we could quickly switch out one rod and keep working while the other lab partner went to remove the contaminate. We could switch off as many times as we needed and save at least a little time.

As soon I fired up his machine sat down to do my first test bead all was right with the world. The torch immediately produced a small, quiet,  beautiful blue pointed heat source. I moved effortlessly across the steel surface and produced smooth concentric circles across the length of the surface. I was back in the grove and fired up to complete at least one task today. I let Bill jump back on to work on his task while I went to clean a few pieces of metal for my butt joint lab.

I mentioned that tungsten rods can easily become contaminated so you must be careful to have a clean metal surface before you even start welding on it. In our class we use a sandblaster to prep the surface of our steel coupons (the 2”x”4 metal pieces) before we start welding on them. This extra step unfortunately adds quite a bit of time to our day as only one student at a time can use the small enclosure to clean parts and the machine has a pressure problem so what should take 2-3 minutes can take 7-10, per piece.  Picture a scientist working with dangerous materials where the but their hands into two openings outside a glass windows. the openings feed into rubber gloves and give you access to a spray nozzle that shoots out the compressed stream of sand. One of you hands controls the nozzle gun and the other hand holds whatever you are blasting. Although the sand will scour the metal surface it just bounces off the heavy rubber gloves and leaves them unharmed.

TIG But Joint


I was able to finish the butt joint after just a few tries of getting the gap right. The gap is the distance between the two pieces of metal and it must be great enough to allow total penetration (the metal from the two pieces melts together and flows into the gap all the way through) but not so great as to cause the edges of both pieces to melt away and not bond.

The day could have gone better but in the end I learned more about overcoming problems with TIG than I had anticipated. Next Saturday, the final.

Oxy Acetylene

Back to Oxy today so I could complete a few of the labs that I skipped when the instructor asked me to jump ahead into Shielded Metal Arc (SMAW). Today I was able to complete the pad with filler and corner joint.

photo

The pad with filler exercise is creating a uniform line on the piece of metal using a a filler rod. As the metal is melted with the torch, the filler is added by lightly pushing the filler rod into the molten pool of metal. The rod melts and bonds with the base metal creating a unified bead running across the plate.


100_0791 

The corner joint is created by leaning two metal pieces together to form a tepee then tacking the opposite corners together. After the corners are tacked, we weld the whole length of the joint so that both pieces form one curved piece of metal.

Today was a good day as I was able to complete both tasks in just a few hours, with time left to clean up and study for next weeks midterm. I will take the test next week and then continue on with the last Oxy task, the dreaded but joint and hopefully also complete the shielded metal arc but joint. If I can do that I will be way ahead of the game and can feel good about missing one class in April when I need to travel to Minneapolis for a volleyball tournament.

Two big games tomorrow. USA vs Canada in hockey, and Purdue vs Michigan State in basketball. The Boilers will be playing without Robbie Hummel who is out for the season with a torn ACL so the rest of the team will need to step up and fill that gap. Both games overlap so thank goodness for Picture in picture and the DVR.

More Stick Welding

I continued with my stick welding in class today and was able to complete two of the three assigned tasks. I was able to complete a steady bead of 3016 stick on a 3/4 inch 4×4 steel plate 8 times in a row. I was also able to completely cover a 4×4 plate with overlappingIMG_0276 beads, keeping them all pretty straight.  With each pass you cut into the previous row by 1/3 of the width of the original bead, so that when you have two rows complete, the first row is only showing 2/3s of its width and the second shows its whole width. The second exercise was not necessarily a real world example, but it shows that your straight bead is repeatable and that you can manipulate the previous bead with your new molten pool of metal without totally screwing things up and compromising the integrity of the original weld. Lincoln Electric has a nice article here on creating high quality stick welds.

The third exercise was a butt joint where you lay two pieces of 16 gauge metal flat on your surface, side by side with a gap between. The gap should be approximately the size of the stick that you are using as the filler material. So, since we were using 3016 stick, you lay the stick in between the to pieces of metal to get your correct gap. The trick here is that each stick has a coating on it and you should NOT include that in your gap width. You need to either eyeball the gap or use the mall one inch end of the uncovered stick as you guide (one end of the stick is uncoated so it makes good contact with the electrode holder you grip when welding).

250px-Welded_butt_joint_x-section
The cross-section of a welded butt joint, with the darkest gray representing the weld or fusion zone, the medium
gray the heat-affected zone, and the lightest gray the base material.

My gap was a bit too big and I was spending too much time in one place, so I kept burning through and could not get the desired ‘keystone’ weld. A keystone weld is where after you complete the weld you theoretically could pick it up, hold it between your fingers and look across the flat surface of the metal weld. You would look right into the gap from one end of the metal and see a nice bump across the top of the weld, the gap totally filled with metal and just a tiny round metal fill coming out the bottom of the gap. Having the tiny metal fill coming out means you had total penetration in your weld and those two pieces of metal are bonded across the whole gap.

I only had about 45 minutes to practice that one so I did not get very far, plus it was not all weld time. We were trying to conserve (not waste) metal so after an attempt we would go over to the punch press and cut the metal to give us another set of surfaces to practice on. A little bit of info that I learned about the weld and the punch press, you should NEVER cut across a weld. When you weld, the metal is forged so that it becomes harder than it was originally. If you try to cut across a weld, the weld will usually win and your blade will loose. It is cheaper to get more 16 gauge and very expensive and time consuming to replace the blades on the press. Don’t cut across welds.

After watching the speed skaters at the Olympics, the process to weld a butt joint makes more sense to me. You have to touch each side of the weld and move across the gap to the other side wile moving down the gap towards your destination. I picture the skater with a piece of metal on each side of his path down the ice. He must touch each side with one of his skates as he moves forward but cannot spend much time in contact with the metal. So touch right side, touch left side, touch right side, touch left side, on and on until you reach the end. You don;t need to worry about filling the gap as the melted metal from one side will naturally flow down into the gap as you slide over to the other side. Notice I did not say jump you as you want to keep you distance to the work constant. Moving too far away from the work causes your arc (picture orange lightening) to jump around and spray your nice pool of molten metal to areas you did not intend.

I will pick this task up next Saturday and have the picture of Apolo Anton Ono or C.J. Celski in my mind as I ‘skate’ across the gap and bind the butt joint.

Shielded Metal Arc Welding

800px-SMAW.welding.navy.ncsToday we were introduced to Shielded Metal Arc Welding. The first two and a half hours of class were concepts and video demos while the second hour and a half was actual hands on practice time. The flow of this new process took a little getting used to compared to last weeks Oxy process. SMAW requires a consumable metal rod instead of just a flame from a torch. With Oxy you just need to worry about keeping the flame the correct distance as you move across the work. With SMAW, the rod is used up (deposited) onto the work surface, so your hand(s) are getting closer and closer to the work as you use up your rod. It took a little getting used to but after about 30 minutes I was comfortable moving left to right (I am right handed) while constantly getting closer to the work surface while keeping the arc (electric spark or heat source) 1/8 to 1/4 inch from the work.

I mentioned yesterday that I listen to podcasts while I run but a process like welding would not be conducive to a distraction like that. I have to tell myself (in my head so people don’t think I am talking to myself) to go slow and keep moving the rod in…. go slow and keep moving the rod in. Trying to concentrate on spoken word would make it impossible for me to keep the correct distance and speed to produce anything other than a worthless blob line on the metal. The only acceptable background music might be classical which is calming and does not require focus to enjoy. But even that kind of music would only be audible between welds. The unavoidable distraction produced by the welding process is the bright glow of the arc and the sizzling bacon sound that it makes which drowns out all other sounds. Its a good thing that it does not SMELL like bacon or we would need to keep taking snack breaks. The glow of the arc actually helps me relax and I think, lets me slow down a bit more than I normally would. Time will tell if I need to adjust my perception of the glow as a help or hindrance.

Happy Birthday to my lovely wife who turns just one year older today. She surely does not look her age (you look much younger dear) since she is a runner as well, and her daily mileage keeps her young and really puts my mileage to shame. We are on our third treadmill (because of usage not age) and are still searching for a good durable home model (read not commercial type expensive). If anyone has a suggestion for an inexpensive durable model (if such a thing exists)I would appreciate a comment with usage experience over at least a year or two. Thanks in advance.

Tomorrow my mileage increases by the 10% rule.

Trying Something New

I always wanted to learn how to weld. Well maybe not always but at least since I was in high school and developed an interest in low-rider’s (mid 60’s Chevy Impala’s). lowriderI knew that if I ever wanted to get one to restore, I would need to reinforce the chassis if I wanted it to hop. Making it ‘Hop’ involves installing hydraulics and putting as much as 500 pounds of batteries in the trunk to power the pumps.

Even if I don’t get that dream car for awhile (2 college educations to pay for still), I want to use that skill for repairs and for some personal art. I started doing stained glass in high school  and wanted another more permanent, industrial, creative outlet.

Another reason for wanting to do this is fear. I had an accident in Catholic grade school that has caused me to have a fear of high voltage electric.  We had no showers in the school so we would wear our gym clothes under our uniforms on gym day. We would have gym and then put our uniforms back on over the sweaty clothes. Good thing we didn’t really care about girls back then. For game nights, we at least go to change in and out of game uniforms in the locker room.

As members of the basketball team at St. Francis, we had volunteered to clean up and repaint the lockers in the boys locker room in the basement. One of the dads had brought in or rented a big electric grinder to get the rust off the lockers before painting. Being an old building, the outlets were not properly grounded (you can see where this is going). Not knowing any better, I was using the grinder to remove the rust without the protection of any gloves. I had used the grinder for a few minutes before stopping to brush the dust off the locker with my bear hand. Grinder housing – metal. Locker – metal. All that was needed was my hands to complete the circuit. Luckily I was not leaning forward when I touched the locker, but rather had a bend in my knee so when I did get the shock, it only lasted a few seconds before I fell back and broke the circuit. No one noticed me until the grinder hit the ground and I muttered something (I am sure I did not swear as I was a good Catholic boy).

Ever since then I have not liked to perform any electrical work because I had not  know the proper preventative measures to take to be safe at that age. I know they stress safety in this welding class so I intend to use this opportunity to learn all that I can about the proper precautions that will get me comfortable with the technology. We will be learning not just electric based but also gas based techniques as there are advantages to each and situations where one is better to use than another.

I am looking forward to the next 16 weeks at the College of Dreams (that is the nick name  for College of DuPage), and who knows, if the economy tanks and the zombies attack, I will have a useful skill to use in the wasteland.